
Edible Architecture: Gingerbread Dreams and Candy Beams
- TheVineKat311
- Dec 13, 2025
- 14 min read
Updated: Feb 9
I think my obsession with gingerbread houses started when I was little, though at the time I didn’t realize it would become one.

Jump to Gingerbread Recipe. Jump to Icing Recipe.
Every year, we used to go to Bear Mountain for a meal with Santa Claus. It was held inside a massive stone lodge with an enormous fireplace, the kind of place that already felt magical before anything festive was added. And right there in the middle of the room was a gingerbread house so large it felt almost unreal. It had rooms, furniture, tables, chairs. It wasn’t a decoration. It was a presence. I remember standing there completely mesmerized, trying to take in every detail, knowing somehow that this was not an ordinary thing.
That feeling stuck with me.
A few years later, as kids, we had another gingerbread tradition that felt just as important. Every New Year’s Eve, the neighborhood families would gather together, and part of the night included the ceremonial destruction and eating of a gingerbread house. It wasn’t delicate or precious. It was meant to be broken apart, shared, and devoured. Gingerbread houses, I learned early on, were never meant to last forever.
Those two experiences stayed with me. The awe of something beautifully constructed, and the understanding that it was temporary by design.
Years later, after my daughters were born, I started making gingerbread houses myself. At first, they were simple and, I’m almost ashamed to admit, made from a kit. Then, over time, they weren’t. Somewhere along the way, restraint left the building entirely. I don’t make them every year, because when I do, I go all in. These houses take time, space, patience, and more than a little mental real estate. This is not a casual project for me. It is a full commitment. It is also pure fun, the kind that makes you forget what time it is.
What follows is not just about baking. It is about planning, structure, patience, and learning how to think of gingerbread and candy as building materials rather than cookies and sweets.
None of this requires starting at the scale I eventually reached. In fact, I didn’t. The same principles apply whether you are building a small, simple house or something far more elaborate. If you start with a modest structure and focus on strong walls, clean joins, and thoughtful details, you will learn everything you need to know. The rest comes later, often whether you plan on it or not.
Before getting into the process, here’s a walk through my 2018 gingerbread house...
Before You Start
If you’ve never made a gingerbread house before, or if the idea feels intimidating, let me say this first: you do not have to go all in.
You can start with a small house. You can use a simple pattern. You can even use a kit and apply a few of these techniques to make it sturdier and more satisfying to work with. The goal is not scale. The goal is to enjoy the process while giving yourself a solid foundation to build on.
Over the years, I’ve learned that the difference between a gingerbread house that collapses in frustration and one that actually holds together has very little to do with artistic talent. It has everything to do with thinking like a builder. Gingerbread is not just a cookie. Royal icing is not decoration. They are construction materials.
Once the structure is sound, that’s where the fun really begins. Color, candy, texture, whimsy. This is the part where you get to play, to make tiny choices that make you smile, and to let creativity take over without everything falling apart underneath you.
What follows are the tips and techniques I’ve learned through trial, error, and more than a few rebuilds. Use what works for you. Leave the rest. This is meant to support your creativity, not limit it.
Before You Bake Anything
Before you preheat the oven or mix a single batch of dough, it’s worth slowing down for a moment and thinking about the house you want to build. This part of the process doesn’t take long, but it makes everything that follows far more enjoyable.
Start with size. A smaller house is not a compromise. In fact, it often leads to a better result. Simple shapes are easier to assemble, more stable, and far less stressful to work with. Decide early how tall the walls should be, how steep the roof will feel, and where doors and windows will go. These decisions do not need to be complicated, just intentional.
Sketching helps more than people expect. It doesn’t need to be pretty or precise. A rough drawing is enough to work through proportions and spot issues before they become baked mistakes. This is also the moment to think about what needs to be structural and what can be decorative. Not everything has to do both jobs.
Cardboard templates are one of the most useful tools you can make. They let you test scale, fit pieces together, and make changes without pressure. If something feels awkward or unstable in cardboard, it will not improve once it becomes gingerbread.

This planning stage is also where it helps to be honest with yourself about how much complexity you want to take on. More detail means more time. More time means more patience. Knowing that upfront keeps the process fun rather than frustrating.
Once you have a plan that feels solid, everything else becomes easier. You’re no longer guessing. You’re building.
Gingerbread as Structure
Once you move beyond a very small house, gingerbread stops behaving like a cookie and starts behaving like a building material. This is where I learned a few lessons the hard way.
One of the most important is internal support. When you build a larger house, especially one with a wide roof span, you cannot rely on the walls alone to hold everything up. Roofs are heavy, and over time they will sag or cave in if they aren’t supported from the inside. I’ve had beautiful houses fail quietly overnight because I didn’t plan for that weight. Now, I always include hidden support pieces inside the structure so the roof has something solid to rest on.
Dough consistency matters just as much. Gingerbread that is too soft may taste great, but it does not make a good building material. Soft dough bends, warps, and weakens as it cools. For structural houses, the dough needs to be stiff, rolled evenly, and baked thoroughly.
Thickness is part of this equation. For most houses, rolling the dough to about a quarter inch thick gives the walls and roof enough strength to support their own weight without flexing. For larger builds, going slightly thicker can help, but consistency matters more than size. Uneven thickness creates weak spots, and weak spots lead to cracks during assembly.
Thinking about gingerbread this way changes everything. You stop decorating a cookie and start constructing a structure. Once the house is sound, the creative part becomes far more enjoyable, because you’re no longer worried about collapse.
Royal Icing Reality
Royal icing is both mortar and decoration, and understanding that dual role is one of the most important parts of building a gingerbread house that actually holds together.
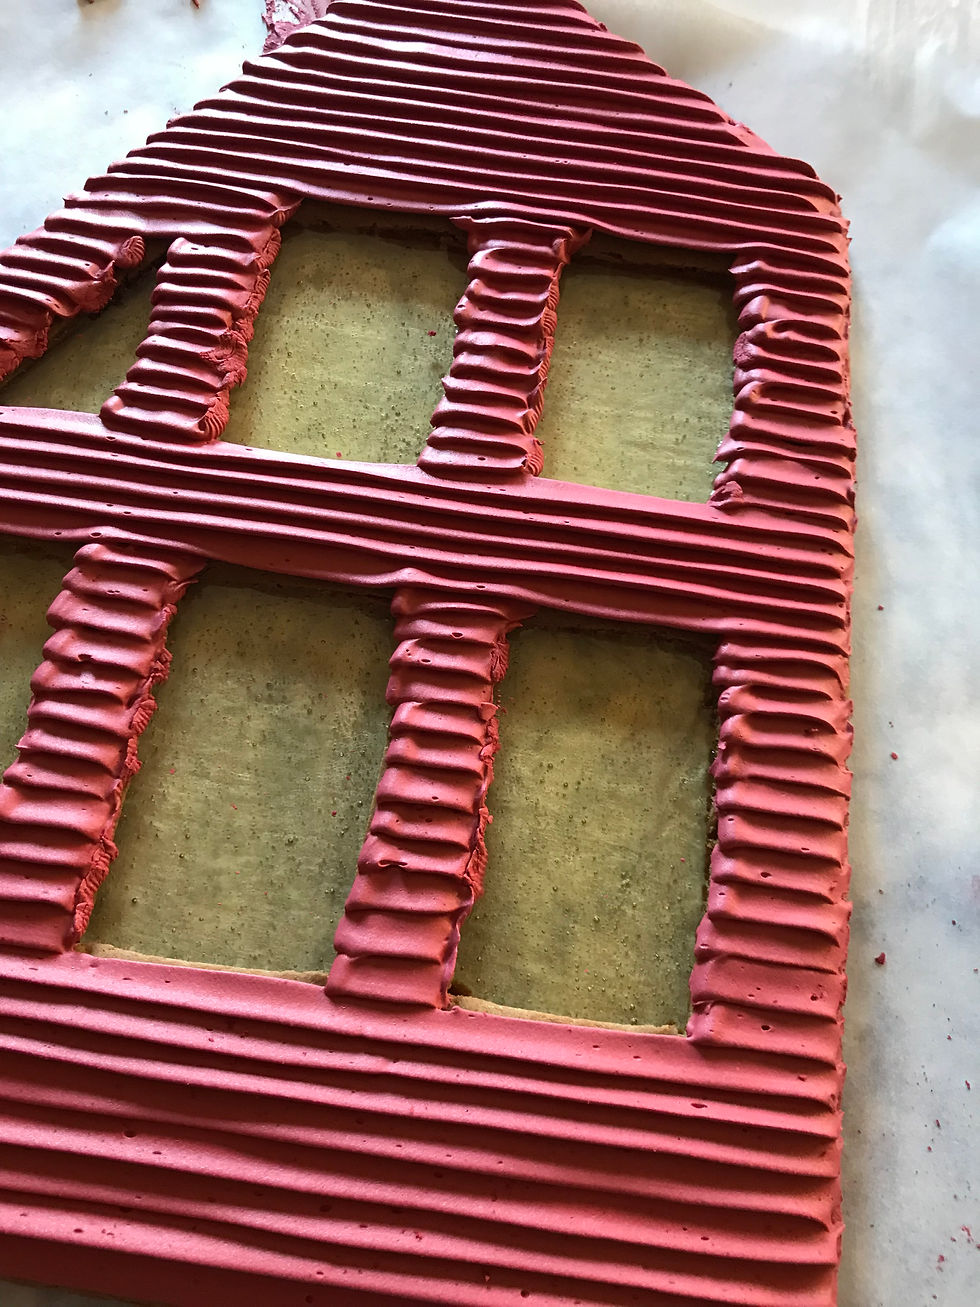
At its thickest consistency, royal icing is structural. This is what I use to assemble walls, reinforce joints, and secure the roof. It needs to be stiff enough to hold weight and strong enough to dry hard. When it’s doing this job, it isn’t pretty, and it doesn’t need to be. Its purpose is strength.
Once the structure is sound, royal icing becomes something else entirely. Thinned slightly, it turns into snow, icicles, and texture. I use it to create snow dripping down rooflines, to shingle roofs, and to soften edges so the house feels finished rather than assembled.
It’s also one of my favorite tools for building trees. Instead of using ice cream cones, which are almost always too wide and out of scale for the houses I make, I build trees from gingerbread. I bake tall gingerbread triangles, secure them together with royal icing, and then cover the surface using a leaf piping tip. The result is a more natural looking evergreen that fits the scale of the house and feels integrated into the landscape rather than dropped on top of it.

Royal icing rewards patience. Different consistencies do different jobs, and learning when to thicken it and when to thin it makes everything easier. Used thoughtfully, it holds the house together and brings it to life at the same time.

Building in Stages
One of the biggest mistakes people make when building gingerbread houses is trying to do too much at once. Gingerbread and royal icing both need time to do their jobs, and rushing the process almost always leads to collapse.
I never assemble an entire house in one go. Walls go up first, and then they rest. Royal icing needs time to set and harden before it can support additional weight. Even when everything looks stable, it’s worth waiting longer than you think you need to. Gravity is patient, and it will always find weak spots if given the chance.
I will often decorate parts of the house before it’s fully assembled, especially the walls. Working on a flat surface is simply easier. Piping details, adding shingles, or finishing windows is far less stressful when the piece is lying down instead of standing upright. It also gives you more control and helps keep details clean.
This isn’t required, and it isn’t the only way to work. Some people prefer to decorate once the house is fully built. I’ve just learned that doing certain elements early makes the process smoother and more enjoyable, especially on larger houses.
Windows are one place where working in stages really pays off. When I want them to look like glass, I pour homemade hard candy directly into the window openings while it’s still hot. Once it cools, it hardens into a translucent pane that catches the light beautifully from the inside. You must do this step before the walls are assembled, when the pieces can stay flat and undisturbed while the candy sets.
Thinking ahead about which details are easier to complete before assembly can save time and frustration later. It’s not about doing everything early. It’s about choosing the moments when gravity works with you instead of against you.
Rolling and Baking the Gingerbread Pieces
Once the planning is done, baking becomes far more straightforward. You’re no longer guessing what you need. You’re making specific parts for a structure you’ve already thought through.
I roll my dough evenly to about ¼ inch thick (6 mm) and cut all of the pieces before baking. Walls, roofs, supports, and any structural elements are baked first. Decorative pieces that don’t carry weight can wait if needed, but anything that needs to stand or support another piece should be made with care and consistency.
Windows and doors are always cut before baking. Trying to cut them afterward almost always leads to cracks or breakage. Clean edges matter here, not perfection. Straight cuts and even thickness will do more for the final build than intricate shapes.
I bake structural pieces thoroughly. Slightly overbaked is better than underbaked when strength is the goal. Soft gingerbread may taste wonderful, but it bends and warps as it cools. A firm bake helps the pieces hold their shape and support weight later on.
As soon as the pieces come out of the oven and are still warm, I refine them. I lay the cardboard templates back on top and re cut the pieces to their exact final size. Gingerbread is still a cookie, and it will expand slightly as it bakes. Trimming while warm corrects that expansion and keeps walls and roof pieces consistent.

A pizza cutter works especially well for straight edges, and a sharp knife is best for windows, doors, and other cutouts. Doing this while the gingerbread is warm makes clean cuts easier and reduces the chance of cracking later on. Once the pieces cool completely, they hold their shape far better and fit together more cleanly during assembly.
Baking is not the most exciting part of building a gingerbread house, but it is one of the most important. Strong, well baked pieces create a foundation that allows the creative work to happen without worry.
Preparing the Pieces Before Assembly
Once the gingerbread pieces are baked and fully cooled, a few small adjustments make a big difference during assembly.
Gingerbread isn’t precise. Even with careful rolling and trimming, pieces can warp slightly or edges can round. Taking a few minutes to refine the pieces before assembling saves frustration later.
This is when I dry fit everything. Walls are stood up without icing. Roof panels are checked for fit and angle. Supports are tested before they’re needed. If something feels off here, it’s far easier to correct than once royal icing is involved.
A little patience at this stage goes a long way.
Structural Gingerbread Dough
Cut in half for a small structure.
This is the dough I use for gingerbread houses that need to stand, support weight, and hold their shape. It is not meant to be soft or delicate. Flavor still matters, but structure comes first.
Dry Ingredients
1080 g all-purpose flour (9 cups)
3 Tbs. ground ginger
2 Tbs. ground cinnamon
2 tsp. ground cloves
2 tsp. baking soda
1½ tsp. salt
Wet Ingredients
3 large eggs
450 g unsalted butter (1 lb.)
450 dark brown sugar (1 lb.)
280 g unsulfured molasses (1 cup)
2 tsp. pure vanilla extract
Instructions:
Make the Dough:
Cream the butter and brown sugar until well combined. Add the eggs, molasses, and vanilla and mix until smooth.
In a separate bowl, whisk together all of the dry ingredients. Add them to the wet ingredients in batches, mixing just until a stiff dough forms.
Divide the dough into manageable portions, flatten into disks, wrap well, and chill overnight or until firm before rolling.
Form the Pieces:
After the dough has chilled, work with one portion at a time, keeping the rest wrapped and cold. Cool dough is easier to roll evenly and helps control spreading.
Roll the dough to about ¼ inch thick (6 mm), using rolling guides if needed to keep thickness consistent. Even thickness matters more than absolute precision. Uneven pieces create weak spots later on.
Lay your templates on the rolled dough and cut the pieces cleanly, leaving a small amount of space between each one. Windows and doors should always be cut before baking.
Transfer the pieces to parchment lined baking sheets. If the dough has softened, chill briefly before baking. Cold dough holds its shape better in the oven.
Time to Bake
Bake structural pieces in a preheated 350°F (175°C) oven until firm and evenly baked, typically 12 to 16 minutes, depending on size and thickness. Edges should look set and slightly darker, and the pieces should feel solid when gently pressed.
Slightly overbaked is better than underbaked for structural work. Soft gingerbread bends and warps as it cools.
Once baked, trim the pieces again while still warm if needed, using the templates as guides. A pizza cutter works well for straight edges, and a sharp knife is best for windows and detailed cutouts. Let the pieces cool completely and dry before assembly.
Royal Icing
Royal icing is both mortar and decoration. It’s what holds a gingerbread house together, and it’s also what brings it to life. For larger builds, it’s far better to make a generous batch than to run out halfway through assembly. This recipe makes enough icing to build and decorate a full sized house without stopping to remix.
Royal Icing with Meringue Powder
Ingredients
1.8 kg confectioners’ sugar (4 lb)
120 g meringue powder (½ cup)
240 to 300 ml warm water (1 to 1¼ cups)
Optional: a small splash of lemon juice or vanilla for flavor
Instructions:
Place the confectioners’ sugar and meringue powder in the bowl of a stand mixer fitted with the paddle attachment. Mix briefly to combine.
With the mixer on low speed, slowly add the warm water until the icing comes together. Once incorporated, increase the speed to medium and mix until smooth, thick, and bright white. The icing should hold stiff peaks and feel dense when piped.
This is your base icing. From here, adjust small portions as needed for different uses.
Substituting Pasteurized Egg Whites Instead
Pasteurized liquid egg whites can be used in place of meringue powder if preferred. This option works well and produces a slightly silkier icing, though it may take a bit longer to dry.
To substitute use 1¼ to 1½ cups pasteurized egg whites instead of the meringue powder and water.
Mix on low speed until incorporated, then increase to medium speed and beat until thick, smooth, and able to hold stiff peaks. Adjust consistency as needed.
Do not combine meringue powder and pasteurized egg whites in the same batch.
Consistency Matters
Royal icing is not one texture. It’s a range.
For structural work, the icing should be very thick. It should hold stiff peaks and resist flowing. This is the consistency used to assemble walls, secure roofs, and reinforce joints.
For decorative work, the icing can be thinned slightly with small amounts of water. This version is used for shingles, snow, icicles, trees, and finishing details. It should flow more easily but still hold its shape.
Start thick and thin only what you need as you go.
Working Tips
Keep royal icing covered at all times. It dries quickly when exposed to air. A damp towel laid over the bowl helps prevent crusting while you work.
If the icing becomes too thick, add water a few drops at a time. If it becomes too thin, sift in a small amount of confectioners’ sugar to bring it back.
Given time to set, royal icing dries hard and strong, providing the structure that allows everything else to happen.
Candy as Architecture, Landscaping, and Light
Once the structure is sound, candy becomes more than decoration. It becomes architecture, landscaping, lighting, and atmosphere. This is where the house stops feeling assembled and starts feeling inhabited. It is the part where I start grinning like a kid again.


At this stage, I think less about sweets and more about materials. Shape, scale, texture, and repetition matter far more than novelty. A candy that looks charming on its own can feel oversized or distracting once it’s placed on the house. Choosing pieces that read correctly in proportion makes everything feel more intentional.
Spearmint leaves make great bushes. Their size, soft edges, and muted green color read as landscaping rather than candy. Mini M&Ms work beautifully as lights, especially along rooflines or around windows. Their smaller scale makes a big difference. Full size candies often feel visually heavy and out of place.


Windows are another place where candy becomes material. When filled with hard candy, they stop being cutouts and start behaving like glass. Light passing through them adds warmth and depth, especially once the house is lit from within.


Flexibility matters too. Gum is surprisingly useful. It can be cut into many shapes and holds detail better than people expect. Starbursts, gently warmed, can be shaped into small presents, flattened and cut into stars, or layered to add dimension. Used thoughtfully, they behave more like modeling material than candy.


Lighting ties everything together. When the interior glow is balanced and evenly distributed, the house feels alive. Sometimes lights need a little help staying where they belong, and taping them in place before the roof goes on can make all the difference. Planning for light early allows it to become part of the design rather than an afterthought.
My goal is always to make everything edible, with the exception of the base and the lights. That constraint keeps the choices honest. Candy isn’t just there to fill space. It has a job to do.
When architecture, landscaping, windows, and light work together, the house feels cohesive rather than crowded. It becomes a small, edible world rather than a collection of decorations.

Knowing when to stop is one of the hardest parts of building a gingerbread house.
There is always one more detail you could add. One more path, one more wreath, one more light. That temptation is part of the joy. A gingerbread house should feel rich with detail, full of small surprises that reward a second or third look.
I’ve learned to step back and look at the house as a whole. Not to quiet it down, but to make sure it feels alive rather than unfinished, with details that feel intentional even when they’re playful.
A gingerbread house doesn’t need to be perfect. It needs to feel done. When it does, you’ll know. That’s usually when it’s time to stop touching it and start admiring what you’ve built.
A Note on Wine
I don’t really have a wine pairing for gingerbread houses.
They’re a project. A commitment. Something you build slowly, often with flour on your sleeves and royal icing where it doesn’t belong. They’re also an excuse to be playful, creative, and a little impractical, to try ideas just to see if they’ll work.
And when they’re done, they’re usually smashed to pieces with a group of excited kids, which is exactly how it should be.
That said, if you’re going to go through the entire process of planning, baking, assembling, and decorating a really great gingerbread house, a bottle of excellent Champagne feels absolutely right. Not as a pairing, but as a reward. Something celebratory to sip while the icing sets and the lights finally go on.
If I had to choose one, it would be Billecart Salmon Rosé.

Comments